Sometimes you may want to not use the built-in avatar feature in WordPress and instead use a image-type custom field.
Consider a “User fields” field group created with Meta Box having an Image Upload type of field with an ID of avatar.

Users (that can edit their user profile) can select an image as their avatar:

Assuming that you are using Bricks theme for your WordPress site, you now want to add an Image element in the single post template and map it to a custom dynamic data tag that returns the ID of the image set for the user that has authored or published the post.
Meta Box provides a handy rwmb_meta() function for getting field values.
Step 1
In your single post template, add a Code element having:
<?php

$img = rwmb_meta( 'avatar', [ 'object_type' => 'user' ], get_the_author_meta( 'ID' ) );

print( "<pre>" . print_r( $img, true ) . "</pre>" );

?>
View any single post on the front end published by a user that has the custom avatar Meta Box field set.
It should be something like:
Array
(
    [542] => Array
        (
            [width] => 150
            [height] => 150
            [file] => 2026/03/frances-harper.jpg
            [filesize] => 15373
            [sizes] => Array
                (
                    [thumbnail] => Array
                        (
                            [file] => frances-harper-150x150.jpg
                            [width] => 150
                            [height] => 150
                            [mime-type] => image/jpeg
                            [filesize] => 6535
                            [url] => https://devsite.local/wp-content/uploads/2026/03/frances-harper-150x150.jpg
                        )

                    [woocommerce_gallery_thumbnail] => Array
                        (
                            [file] => frances-harper-100x100.jpg
                            [width] => 100
                            [height] => 100
                            [mime-type] => image/jpeg
                            [filesize] => 3970
                            [url] => https://devsite.local/wp-content/uploads/2026/03/frances-harper-100x100.jpg
                        )

                )

            [image_meta] => Array
                (
                    [aperture] => 0
                    [credit] =>
                    [camera] =>
                    [caption] =>
                    [created_timestamp] => 0
                    [copyright] =>
                    [focal_length] => 0
                    [iso] => 0
                    [shutter_speed] => 0
                    [title] =>
                    [orientation] => 0
                    [keywords] => Array
                        (
                        )

                )

            [ID] => 542
            [name] => frances-harper.jpg
            [path] => /Users/sridharkatakam/Sites/devsite/app/public/wp-content/uploads/2026/03/frances-harper.jpg
            [url] => https://devsite.local/wp-content/uploads/2026/03/frances-harper-150x150.jpg
            [full_url] => https://devsite.local/wp-content/uploads/2026/03/frances-harper.jpg
            [title] => frances-harper
            [caption] =>
            [description] =>
            [alt] =>
            [srcset] => https://devsite.local/wp-content/uploads/2026/03/frances-harper-150x150.jpg 150w, https://devsite.local/wp-content/uploads/2026/03/frances-harper-100x100.jpg 100w, https://devsite.local/wp-content/uploads/2026/03/frances-harper.jpg 250w
        )

)
As can be seen, the array has a single element with the key of the image ID (542, in this example).
Since we want to be able to set the image size in the Image element’s controls, we need to pull this ID rather than the image URL.
Step 2
Add the following in child theme‘s functions.php (w/o the opening PHP tag) or a code snippets plugin:
<?php

/**
 * Get the attachment ID of the author's avatar from Meta Box.
 *
 * @param int $user_id The user ID. Defaults to the current post author.
 * @return int The attachment ID, or 0 if not set.
 */
function brickslabs_get_author_avatar_id( $user_id = 0 ) {
	if ( ! $user_id ) {
		$user_id = get_the_author_meta( 'ID' );
	}

	$images = rwmb_meta( 'avatar', array( 'object_type' => 'user' ), $user_id );

	if ( empty( $images ) ) {
		return 0;
	}

	return (int) key( $images );
}
key() function of PHP returns the index element of the current array position.
Step 3
Next, whitelist the brickslabs_get_author_avatar_id function.
Ex.:
<?php

add_filter( 'bricks/code/echo_function_names', function() {
  return [
    'brickslabs_get_author_avatar_id'
  ];
} );
You should also add other functions (native or custom) being used in your Bricks instance besides brickslabs_get_author_avatar_id. This can be checked at Bricks → Settings → Custom code by clicking the Code review button.
More info on whitelisting can be found here.
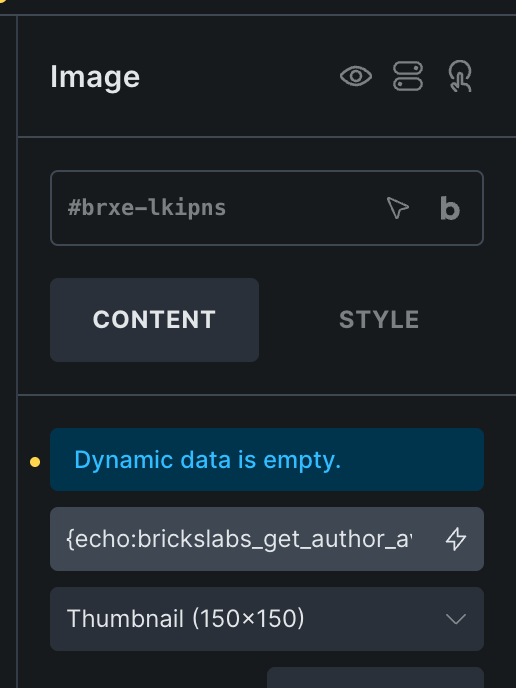
Step 4
Add an Image element in your single post Bricks template and set its source to:
{echo:brickslabs_get_author_avatar_id}
Select your desired image size.
The Code element from Step 1 can now be deleted.