
This tutorial provides the builder settings, PHP & CSS codes that can be pasted in order to create an infinite logo slider in pure CSS inside Bricks Builder.
Table of Contents
- Requirements
- Add a new Custom Post
- Assign the Custom Fields
- Fill the data
- The DOM Structure in Bricks
- The Bricks Settings
- The CSS animation
- Conclusion
Requirements
Before to start building our logo slider, make sure to have the following tools running on your configuration:
- Bricks version 1.5 beta or above
- Bricks child theme
- ACF free or pro version
Add a new Custom Post
The first thing to do is to add a new custom post type to easily add/organize our logos. There are different ways to accomplish it, but since I prefer to avoid installing new plugins, we’ll add the PHP code in our child theme. To make my life easier, I used a post type generator like the one you find on https://generatewp.com/post-type/.
Here is the final code I pasted in the functions.php file of my child theme:
// Register a Custom Post Type named Logos
function bl_logos_custom_post_type() {

	$labels = array(
		'name'                  => _x( 'Logos', 'Post Type General Name', 'text_domain' ),
		'singular_name'         => _x( 'Logo', 'Post Type Singular Name', 'text_domain' ),
		'menu_name'             => __( 'My Logos', 'text_domain' ),
		'name_admin_bar'        => __( 'Logo', 'text_domain' ),
		'archives'              => __( 'Item Archives', 'text_domain' ),
		'attributes'            => __( 'Item Attributes', 'text_domain' ),
		'parent_item_colon'     => __( 'Parent Item:', 'text_domain' ),
		'all_items'             => __( 'All Items', 'text_domain' ),
		'add_new_item'          => __( 'Add New Item', 'text_domain' ),
		'add_new'               => __( 'Add New', 'text_domain' ),
		'new_item'              => __( 'New Item', 'text_domain' ),
		'edit_item'             => __( 'Edit Item', 'text_domain' ),
		'update_item'           => __( 'Update Item', 'text_domain' ),
		'view_item'             => __( 'View Item', 'text_domain' ),
		'view_items'            => __( 'View Items', 'text_domain' ),
		'search_items'          => __( 'Search Item', 'text_domain' ),
		'not_found'             => __( 'Not found', 'text_domain' ),
		'not_found_in_trash'    => __( 'Not found in Trash', 'text_domain' ),
		'featured_image'        => __( 'Featured Image', 'text_domain' ),
		'set_featured_image'    => __( 'Set featured image', 'text_domain' ),
		'remove_featured_image' => __( 'Remove featured image', 'text_domain' ),
		'use_featured_image'    => __( 'Use as featured image', 'text_domain' ),
		'insert_into_item'      => __( 'Insert into item', 'text_domain' ),
		'uploaded_to_this_item' => __( 'Uploaded to this item', 'text_domain' ),
		'items_list'            => __( 'Items list', 'text_domain' ),
		'items_list_navigation' => __( 'Items list navigation', 'text_domain' ),
		'filter_items_list'     => __( 'Filter items list', 'text_domain' ),
	);
	$args = array(
		'label'                 => __( 'Logo', 'text_domain' ),
		'description'           => __( 'A list of of partner\'s logos', 'text_domain' ),
		'labels'                => $labels,
		'supports'              => array( 'title' ),
		'taxonomies'            => array(),
		'hierarchical'          => false,
		'public'                => true,
		'show_ui'               => true,
		'show_in_menu'          => true,
		'menu_position'         => 5,
		'show_in_admin_bar'     => false,
		'show_in_nav_menus'     => false,
		'can_export'            => true,
		'has_archive'           => false,
		'exclude_from_search'   => true,
		'publicly_queryable'    => false,
		'capability_type'       => 'page',
	);
	register_post_type( 'bl_logo', $args );

}
add_action( 'init', 'bl_logos_custom_post_type', 0 );
If you are uncomfortable adding this PHP code, you can use a plugin such as CPT UI. It will produce the same results.
Assign the Custom Fields
Now let’s jump into ACF and create a new Field Group called Logos. We’ll add two fields:
- an Image field called
Logo Image - an URL field called
Logo URL
Make sure to assign the Field Group to our Custom Post Logo.

Fill the data
The next step is to create new posts inside our custom post Logos and upload the logos and URLs.

If the custom fields have been correctly assigned to our custom posts, we should see them popping up inside our posts just like this:

The DOM Structure in Bricks
Now that the CPT/ACF part is done, let’s jump back inside the Bricks builder and create our logo slider. In order to do that, we’ll create the following DOM structure:
- a general container (div element)
- a track (div element)
- the URL container where we’ll apply our query loop (div element)
- the logo image (image element)

The Bricks Settings
Let’s apply the correct settings to each element.
Logo Container
Create and assign a class called logo-container.

We don’t need to apply any particular styles to it. The only thing we need to do is to copy/paste the following code inside the Custom CSS field:
root, root > .logo-track{
    display: grid;
    grid-auto-flow: column;
    grid-auto-columns: max-content;
}
Logo Track
Just like our container, just add logo-track class to the element and keep the default styles.

Logo URL
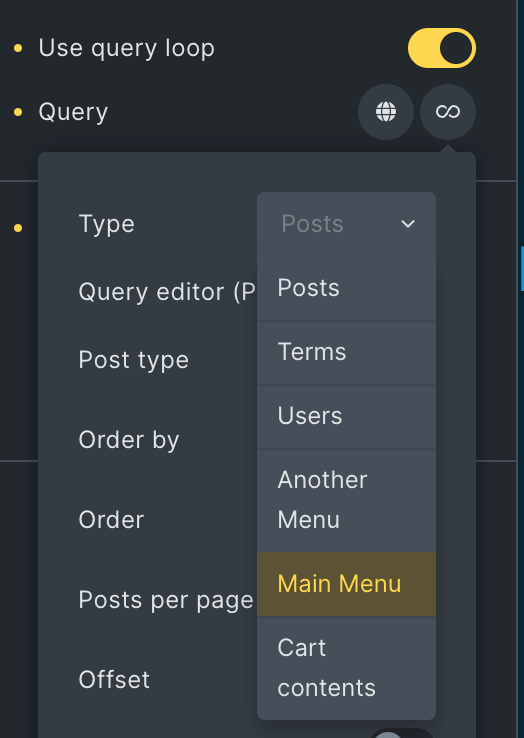
Here is where most of the Bricks magic take place! First of all, let’s add a logo-url class. Then enable the query loop option and make sure to select the custom post type Logos (second screenshot).
Once the query loop is set, let’s change Link option do Dynamic Data and select our ACF field Logo URL.


Let’s also modify the HTML tag to be a hyperlink:

Now let’s style our .logo-url class with some margins:

And let’s apply the following filters options:
- Brightness set to 0
- Opacity set to 30
- Saturation set to 0
Let’s also add a CSS transition of 200ms.

Logo Image
On our Image element, we just need to select our ACF field Logo Image as the source and set the object-fit field to Contains.

We also want all the logos to have equal heights, so let’s set jump on the style tab and set the Height to 35px.

Duplicate the Tracks
Once all the settings have been set, we need to duplicate the Track element. If you have 5-6 logos, you’re probably good to go with one duplicate track, but just to be sure it will span on full width even on bigger screens, we’ll duplicate it two times.
Here is the final DOM structure:

The CSS animation
The final step is to add the following CSS to your page settings:
.logo-track {
   animation: 20s infiniteScroll linear infinite;
}

.logo-container:hover .logo-track{
  -webkit-animation-play-state: paused;
  -moz-animation-play-state: paused;
  -o-animation-play-state: paused;
   animation-play-state: paused;
}

.logo-url:hover {
   filter: none;
}

@keyframes infiniteScroll {
   100%{
       transform: translateX(-100%);
   }
}
If you’d like to change the speed of the slider, just change the value of 20s to the value of your choice. Increasing the animation-duration will make it slower, and decreasing it will make it faster.
Note that the CSS applying on logo-url:hover could be added as an :hover state inside bricks, but due to a bug on Bricks 1.5 beta we decided to add it as pure CSS.
Conclusion
If you followed all the steps correctly, this is what you should see on the frontend:
When you need to edit the logos, you won’t have to make any changes in Bricks. Just edit the posts in your custom post type and it will automatically be updated in all the places where is query loop is running. I hope you enjoyed this tutorial, and if you did, make sure to show some love to BricksLabs!


1 comment
Nathan
Thank you for this. The only problem i am having is the container goes off the page, i can now scroll horizontally